ColorClicker is an color detection automatic mouse clicker and key input generator that will click and type up to 4 specified targets any number of specified times. With ColorClicker you can completely automate a windows computer. Mouse and keyboard events are triggered by a single pixel color match.
Great for scripting programs that are not traditionally scriptable, or automate tasks that are not traditionally automated. You are also able to fully automate a sequence of mouse clicks and keys being pressed and you can save these scripts and automatically load and execute them.
Features:
Keyboard emulation/simulation
Save scripts
Load scripts
Automatically load scripts
Automatically Arm
Automatically load with Windows
Specify up to 4 targets.
Selectable delay between clicks
Optionally select double click
Easy to use targeting system
Visually displays coordinate status
Check target locations by double clicking red (loaded) square
Variable delay between clicks
Selectable number of repetitions
Repeat forever function
Automatic minor updates
Large visual status
Have a look at the demonstration of ColorClicker V2.00.
We use a few web pages and a simple demo program to show the actions. Look at the MouseClicker demo for a better explanation of targeting
It shows (in order):
Selecting the color to trigger the events.
Selecting the pixel the program will watch for a change.
Enable repeats - for 2 times only.
Click the button in the test program.
Enable the checkbox in the test program.
Enter text in the text box.
Fix the "problem" by selecting the good.html file that loads the green page - by double clicking.
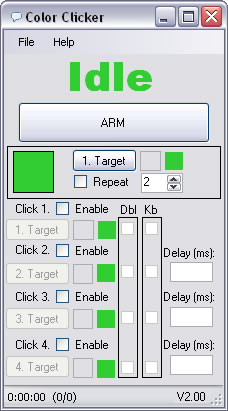
How to use:
Simply, enable the required number of clicks, by ticking the Click Enable box.
Load the Co-ordinates by clicking the "target button"
You will notice the status box changing from green to orange, and a text box will become usable. The cursor will also be blinking inside the text box
Now hover the mouse over the desired target and hit any key.
You will notice the status box change to red. This indicates the mouse location coordinates are loaded. Double click the red box to check where your target is loaded.
New in version 1.02 - Select the Dbl checkbox to perform a double mouse click rather than a single click.
Simulate keyboard inputs. Left click "Kb" checkbox to bring up a dialog box to enter text. Right click the "Kb" checkbox to modify existing text. The keyboard will be simulated AFTER the click/double click has been performed.
Use the information below to construct complex keyboard inputs. Please note the characters " is used to emphasize a string, and should not be entered into the dialog box, unless quotation marks are required.
Use the Kb feature to send keystrokes to applications that have no automation interface. Most keyboard characters are represented by a single keystroke. Some keyboard characters are made up of combinations of keystrokes (CTRL+SHIFT+HOME, for example). To send a single keyboard character, send the character itself as the string argument.
You can use Kb to send more than one keystroke at a time. To do this, create a compound string argument that represents a sequence of keystrokes by appending each keystroke in the sequence to the one before it. For example, to send the keystrokes a, b, and c, you would send the string argument "abc". The Kb feature uses some characters as modifiers of characters (instead of using their face-values). This set of special characters consists of parentheses, brackets, braces, and the:
plus sign "+",
caret "^",
percent sign "%",
and tilde "~"
Send these characters by enclosing them within braces "{}". For example, to send the plus sign, send the string argument "{+}". Brackets "[ ]" have no special meaning when used with Kb, but you must enclose them within braces to accommodate applications that do give them a special meaning.
To send bracket characters, send the string argument "{[}" for the left bracket and "{]}" for the right one.
To send brace characters, send the string argument "{{}" for the left brace and "{}}" for the right one.
Some keystrokes do not generate characters (such as ENTER and TAB). Some keystrokes represent actions (such as BACKSPACE and BREAK). To send these kinds of keystrokes, send the arguments shown in the following table:
Key
Argument
BACKSPACE
{BACKSPACE}, {BS}, or {BKSP}
BREAK
{BREAK}
CAPS LOCK
{CAPSLOCK}
DEL or DELETE
{DELETE} or {DEL}
DOWN ARROW
{DOWN}
END
{END}
ENTER
{ENTER} or ~
ESC
{ESC}
HELP
{HELP}
HOME
{HOME}
INS or INSERT
{INSERT} or {INS}
LEFT ARROW
{LEFT}
NUM LOCK
{NUMLOCK}
PAGE DOWN
{PGDN}
PAGE UP
{PGUP}
PRINT SCREEN
{PRTSC}
RIGHT ARROW
{RIGHT}
SCROLL LOCK
{SCROLLLOCK}
TAB
{TAB}
UP ARROW
{UP}
F1
{F1}
F2
{F2}
F3
{F3}
F4
{F4}
F5
{F5}
F6
{F6}
F7
{F7}
F8
{F8}
F9
{F9}
F10
{F10}
F11
{F11}
F12
{F12}
F13
{F13}
F14
{F14}
F15
{F15}
F16
{F16}
To send keyboard characters that are comprised of a regular keystroke in combination with a SHIFT, CTRL, or ALT, create a compound string argument that represents the keystroke combination. You do this by preceding the regular keystroke with one or more of the following special characters:
Key
Special Character
SHIFT
+
CTRL
^
ALT
%
Note:
When used this way, these special characters are not enclosed within a set of braces.
To specify that a combination of SHIFT, CTRL, and ALT should be held down while several other keys are pressed, create a compound string argument with the modified keystrokes enclosed in parentheses. For example, to send the keystroke combination that specifies that the SHIFT key is held down while:
e and c are pressed, send the string argument "+(ec)".
e is pressed, followed by a lone c (with no SHIFT), send the string argument "+ec".
You can use the Kb feature to send a pattern of keystrokes that consists of a single keystroke pressed several times in a row. To do this, create a compound string argument that specifies the keystroke you want to repeat, followed by the number of times you want it repeated. You do this using a compound string argument of the form {keystroke number}. For example, to send the letter "x" ten times, you would send the string argument "{x 10}". Be sure to include a space between keystroke and number.
Note:
The only keystroke pattern you can send is the kind that is comprised of a single keystroke pressed several times. For example, you can send "x" ten times, but you cannot do the same for "Ctrl+x".
Note:
You cannot send the PRINT SCREEN key {PRTSC} to an application.
Repeat this step for the remanding clicks if required. You can also add a delay in milliseconds to add before this click is fired.
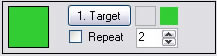
Next, select where ColorClicker will look for colors. The targeting system works the same as the click targets. Simply click the Target button, move the mouse to the desired position, and hit the space bar.
Select repeat if you would like to keep triggering for a specific number of times. Or select 0 to repeat forever.
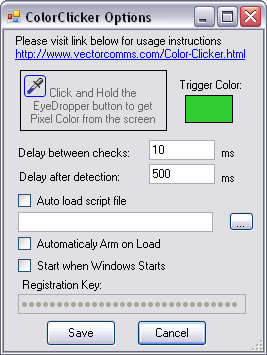
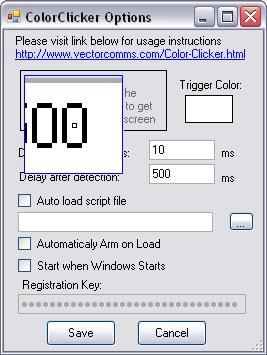
Now all that is left is to choose the color that will trigger ColorClicker to fire the clicks. Select File -> Options to bring up the Options window.
Select the eye dropper and drag it over the color on the screen. You will see a zoom window appear to assist selecting the color. Let the mouse button go over the color you choose.
Hit the "Save" button and then "ARM" button when you are ready to go.
You will notice a timer counting on the bottom left corner, and a countdown of how many clicks have fired out of the total (if repeats are selected).
MouseClickerScript files - ".mcs"
You can now save and load your automation settings to a file or files. Simply select File-> Save Script (or Save Script As).
ColorClicker Options
"Delay between checks" - specifies how often ColorClicker will wait between checking the screen for the color you have selected. 1000ms (milliseconds) is equal to 1 second
"Delay after detection" - This is how long ColorClicker waits after it has detected your color on the screen before checking again (if repeats are selected). 60000ms (milliseconds) is equal to 60 second. IMPORTANT: this number must be larger than all of the delays you have!
"Auto load script file" - will automatically load a saved script file when ColorClicker loads.
"Automatically Arm on Load" - will arm ColorClicker when ColorClicker load. Used in conjunction with "Auto load script" means you can completely automate a defined sequence.
"Start when Windows Starts" - will add ColorClicker to the "Run" section in the registry and automatically load ColorClicker when windows boots. - Please uncheck this option before uninstalling ColorClicker.
Forgotten where your targets are?
Not a problem. Just expand the targeting area and double click on the red square target indicator. The mouse will instantly jump to where your target was programmed (without clicking!).
Windows Vista and Windows 7 Users?
Disable UAC (User Account Control) and run as Administrator should resolve any issues you have running ColorClicker.
(registered version only)
Tick the Repeat box to have the click repeat up to 999 times. Or put a 0 (Zero) in the text box to repeat forever.
How to register:
Simply click the Options/Register item from the File menu and enter the Registration key emailed to you into the text box.
Click Save, and restart the ColorClicker application. All 4 clicks with delays, double clicks, keyboard inputs and repeats will be enabled.
Download the full/demo version here. (demo limited to 2 clicks & no repeats)